Lecture 11 — Modules, Images
Overview
- Material for this lecture is drawn from Chapter 4 of Practical Programming.
- We will concentrate on making use of existing modules.
- We will NOT use the media module discussed in the text, opting instead for the more widely-used PIL (Python Imaging Library), comprised of multiple modules.
- We will also talk about writing our own modules, and the difference between running and exporting modules.
Basics of modules
A collection of Python variables, functions and objects, all stored in a file
Modules allow code to be shared across many different programs.
Before we can use a module, we need to import it:
>>> import module_name
Importing makes the functions in the module available for use. We have seen this in homeworks.
Importing vs. Running a module
You can also write code in a module that is executed only when the module is directly executed, but not when it is exported. Let us write a simple module named test_module.py
def test_square(num):
    return num**2

if __name__ == '__main__':
    print test_square(4)
We will see the difference between exporting and running this module in class.
When a Python script is executed, its name is __main__.
When a Python script is imported, its name is the name of the file, e.g. test_module. You can also rename it as you wish:
>>> import test_module as t
>>> t.test_square(4)
Built-In Modules
Type
>>> help(__builtins__)
to see all of the modules Python has built-in. These do not need to be imported.
You will notice several that have two underscores at the start and end, such as
__add__
__contains__
__eq__
__len__
These names have special Python syntax associated with them:
- __add__ is equivalent to +,
- __contains__ is equivalent to in, and
- __eq__ equivalent to ==.
For example,
>>> s0 = "Hello"
>>> s1 = "Good-bye"
>>> s0 + s1
'HelloGood-bye'
>>> s0.__add__(s1)
'HelloGood-bye'
>>> s2 = "Go"
>>> s1.__contains__(s2)
True
>>> s2 in s1
True
>>> s1.__len__()
8
>>> len(s1)
8
We will generally use the “special” syntax, but be aware of the equivalence to the __ syntax when you are learning to use object methods.
PIL — Python Image Library
PIL is a series of modules built around the Image type, our first object type that is not part of the main Python language
- We have to tell Python about this type through import
We will use images as a continuing example of what can be done in programming beyond numbers and beyond text.
See
http://effbot.org/imagingbook/pil-index.htm
for more details.
Images
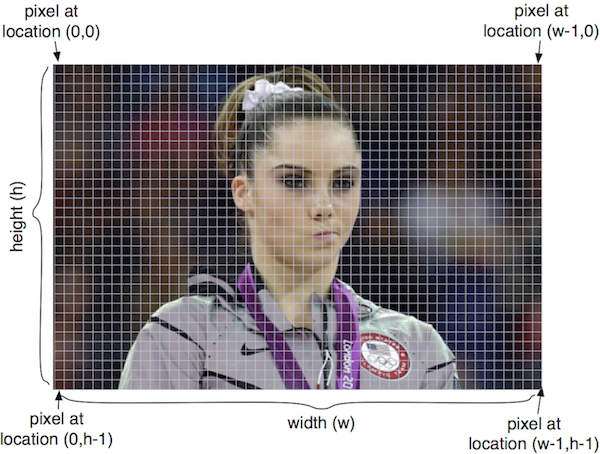
An image is a two-dimensional matrix of pixel values
The origin is in the upper left corner, see below:
Pixel values stored in an image can be:
- RGB — a “three-tuple” consisting of the red, green and blue values, all non-negative integers
- L — a single “gray-scale” integer value representing the brightness of each pixel
Some basic colors:
Color (red,green,blue) value Black (0,0,0) Red (255,0,0) Green (0,255,0) Blue (0,0,255) White (255,255,255) Light Gray (122,122,122)
Some important image modules
- Image module contains main functions to manipulate images: open, save, resize, crop, paste, create new images, change pixels, etc.
- ImageDraw module contains functions to touch up images by adding text to it, draw ellipses, rectangles, etc.
- ImageFont contains functions to create images of text for a specific font.
Image Type and Methods
- Let us now see some very useful image methods
- im = Image.open(filename) reads an image with the given filename and returns an image object. It assumes the file is stored in the same directory as your script.
- im.show() displays the image
- im.save(filename) saves the image to the given file
- Images have the following constants: im.format, im.size, im.mode
- im.resize((width,height)) resizes an image to a given size.
- im.convert(mode) changes the mode of an image.
- im.crop((w1,h1,w2,h2)) creates a new image by cropping the given box from the current image
- im.transpose(flip_position) creates the mirror reflection of the image in the given direction
- Image.new("RGB",(width,height)) create a new image of given dimensions.
Our First Image Program
import Image

filename = "chipmunk.jpg"
im = Image.open(filename)
print '\n' '********************'
print "Here's the information about", filename
print im.format, im.size, im.mode

gray_im = im.convert('L')
scaled = gray_im.resize( (128,128) )
print "After converting to gray scale and resizing,"
print "the image information has changed to"
print scaled.format, scaled.size, scaled.mode

scaled.show()
scaled.save(filename + "_scaled.jpg")
- The Image.open function:
- Opens the file and creates an image (new type, remember), and associates it with the variable name im
- format, size, mode are all variables associated with
the image, describing
- the image file format — JPG in this case
- the width and height of an image, as a “tuple” (a new Python type we have not yet used)
- the mode of the pixel data in the image — RGB values or gray
scale values (indicated by 'L')
- Note that 'RGB' and 'L' are both strings.
- image methods used in this example
- convert to change the mode of the image from RGB to gray
- resize to create a new image of a different size
- The new size is given by the tuple

- The new size is given by the tuple
- show to display the image
- save to output it.
Example 2: Cut and pasting parts of an image
This example crops three boxes from an image, creates a new image and pastes the boxes at different locations of this new image.
import Image

im = Image.open("lego_movie.jpg")
w,h = im.size

# Crop out three columns from the image
## Note: the crop function returns a new image
part1 = im.crop((0,0,w/3,h))
part2 = im.crop((w/3,0,2*w/3,h))
part3 = im.crop((2*w/3,0,w,h))

## Create a new image
newim = Image.new("RGB",(w,h))
## Paste the image in different order
## Note: the paste function changes the image it is applied to
newim.paste(part3, (0,0))
newim.paste(part1, (w/3,0))
newim.paste(part2, (2*w/3,0))
newim.show()
Important image methods used:
- crop — extracts a region of the image given by the upper left and lower right corners represented as a four-tuple
- paste — overwrites one image with another, starting at the upper left corner.
Note that many of the PIL functions actually change the image object we are working with
- This is an implementation decision made by the designers of PIL, mostly because images are so large and copying is therefore time consuming.
Image Examples Are Good Illustrations of Nested For Loops
- We will start with the problem of converting a color image to gray scale as an example of the use of a double for loop. This is the module rgb2gray.py on the course site.
- We will modify this to do several things:
- Flip an image upside down
- Reflect an image left-right
- Create a pixellated version of the image
Summary
Modules contain a combination of functions, variables, object definitions, and other code, all designed for use in other Python programs and modules
After they are imported, the functions in a module can be executed by a call of the form:
module_name.function_name(arguments)
PIL provides a set of modules that define the Image object type and associated methods.