Install On Mac OS X
Install Miniconda Python 3.6
To get started you need to download the OSX miniconda installer.
- Click on the link https://repo.continuum.io/miniconda/Miniconda3-latest-MacOSX-x86_64.sh
- Wait for it to download. It will place a file called Miniconda3-latest-MacOSX-x86_64.sh in your downloads folder. On my computer using Safari this is ~/Downloads
Open at Terminal window. If you don’t know how to do this click * Applications -> Utilities -> Terminal*
Within Terminal “change directories into the folder where your downloaded file lives, i.e.
cd ~/Downloads
Now run the bash “shell” program to install Miniconda
bash Miniconda3-latest-MacOSX-x86_64.sh
Scroll through the license (press the space bar to move through quickly), type ‘yes’ to approve the terms, and then accept all the installation defaults.
Close the Terminal program. Then, restart it.
Within the Terminal type:
conda install pillow
- Enter y at the Proceed prompt.
- When the installation completes, close the Terminal window.
Install Wing IDE and Connect It to Miniconda Python
The second half of the installation is the Wing IDE development environment. This is the software that you use to write, edit and test your Python programs. Wing IDE calls Python to actually run the program. Therefore, we have to download and install Wing IDE and then tie it to the Miniconda version of Python.
- Go to http://wingware.com/downloads/wingide-101
- Download the installer for your operating system. For Mac OS X this downloads an installation dmg package. Double click on it to install and follow the instructions. As with miniconda, you may need to answer of few questions and accept the license agreement. You should use the default settings. If you see a security problem, see Security Problems.
- Open the Wing IDE application. We’ll explore this application in lecture and in lab, but for now we just need to tell Wing about Miniconda Python. To do this, click on the menu and then Edit -> Configure Python
- For the Python Executable click on Custom and then Browse to the location for the Miniconda Python executable. On my Mac this is /Users/stewart/miniconda3/bin/python3.6 See the following
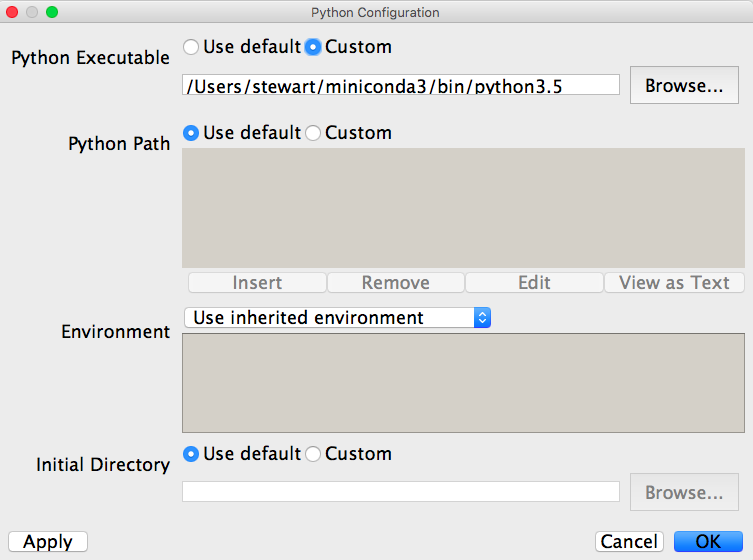
- Ignore the Python Path and all other settings and click OK.
- Back in the main Wing IDE it may ask you to restart the python shell. Once you do then you should see at the top of the Python Shell window pane something about “3.6 |Continuum Analytics, Inc.” etc. If you have this you are all set and the installation is complete!
Detecting 64-bits versus 32-bits Mac OS X Systems
You are running 64-bit Mac OS X.
Technically, all Apple computers purchased since Q4 2006 have been equipped with 64-bit capable processors. The Mac OS X operating system has supported 64-bit by default since OS X 10.6 Snow Leopard, released in 2009. The upgrade to the latest operating system for your computer is available for free, directly from Apple, since the release of OS X 10.9 Mavericks in 2013.
Security Problems
For OS X 10.7 and later: The installation of a software package like Wing 101 might fail due to a security feature, called Gatekeeper. If you have a problem, you will get a message that looks like:
"Wing 101" can't be opened because it is from an unidentified developer.
Option 1: One time security bypass:
To temporarily bypass Gatekeeper, right-click (or Control-click) on the app’s icon and select Open. You’ll still receive an alert message, but this time it’s only a warning. Clicking Open again will launch the app.
We recommend that you do not make a habit of using this bypass however. Use this method, only if you are certain that there is no security risk with the software you are installing, such as Wing 101.
Option 2: Disable security feature, install and re-enable it:
In this second method, you will disable gatekeeper first, install the software, then re-enable it. Unfortunately, this has been made difficult for later versions of Mac OS X like Sierra. So, we will offer two methods to do this. Option 2.2 should apply to all versions, but not recommended for users new to Unix.
Option 2.1: Try the following instructions (earlier versions of OS X):
Click the Apple icon in the menu bar and select
System Preferences.Go to
Security & Privacy— It is located in the first row, which is entitledPersonal.Click on the
Generaltab.Authenticate: Click on the lock at the bottom-lefthand corner of the screen and subsequently input your computer user account password.In the bottom half of the
Generaltab, there will be the following choices:Allow applications downloaded from:
- ( ) Mac App Store
- (X) Mac App Store and identified developers
- ( ) Anywhere
If you cannot see the option
Anywhere, follow instructions for Option 2.2 below.Select
Anywhereand selectAllow From Anywherein the subsequent dropdown warning. We will be re-enabling this feature after the installer is completed.Install the software package.
Once the installer has completed, go back to the
System Preferenceswindow and re-select the optionAllow applications downloaded from:
- ( ) Mac App Store
- (X) Mac App Store and identified developers
- ( ) Anywhere
This will return the security settings back to normal.
Close
System Preferenceswindow.
Option 2.2: Terminal solution (later versions of OS X):
In Sierra, OS X got rid of the Anywhere option. So, you will need to
use a different method for allowing this. As this method makes a
permanent change to your computer that is not visible from an
interface, we recommend you ask help from a TA or a mentor to follow
these steps.
Open a Terminal window from Applications->Utilities. Type the
following command:
sudo spctl --master-disable
This will ask you to type in your password, which is likely the administrator password for the computer. This enables software to be installed from any source. Now you should be able to install any software.
As in Option 2.1, we want to revert back to the original settings after this action. Once you are done with the installation, again using a Terminal, type the following command:
sudo spctl --master-enable
This should restore the original security settings. A word of caution, do not use the sudo option on a regular basis as this bypasses all security settings. Some of us caused real harm to our computers by using this command unwisely.