Advanced Computer Graphics
Contact Information
Office Hours
Syllabus
Prerequisites
Textbook
Grading
Assigned Readings
Calendar
Lecture notes
Lab materials
Homework
Test reviews
Homework
Collaboration Policy
Compilers
gcc/g++ notes
GL/glut notes
Homework Late Policy
Electronic Submission
Final Project
Spring '09 Projects
Spring '08 Projects
Spring '07 Projects
Assignment 4: Using the Stencil Buffer & GPU
The goal of this assignment is to become familiar with both classic graphics hardware (the stencil buffer) and the modern GPU (using programmable geometry & pixel shaders).
GRADING NOTE:
Tasks
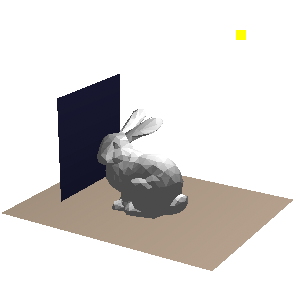
- First, download and compile the provided files. The basic
program will load an .obj into a scene. An appropriately sized quad
that represents the floor is placed beneath the object and an
appropriately sized quad that represent the mirror is placed to the
left of the object. A yellow point above the object represents the
position of a point light source. Pressing 'a' will toggle animation
of this light, moving it in a circle above the object. Pressing the
space bar will move the light one step along this path.
./hardware -input bunny_1k.obj
-
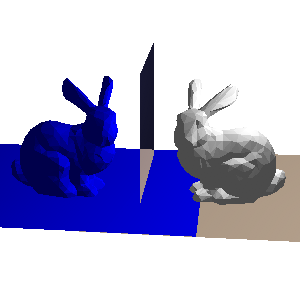
Press 'm' to toggle stencil buffer mirror rendering, which is
incomplete. You need to write code to "duplicate" and render the
geometry of the mirrored object and floor as they appear to exist,
reflected in the mirror. Pressing 'r' will toggle a visualization of
the reflected geometries, rendered in blue. If everything is working
with your stencil buffer, the mirror visualization should then work as
shown in the picture below. The objects in the mirror are tinted
slightly blue for effect.
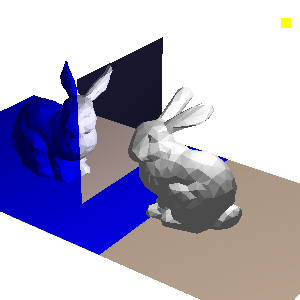
If you study the resulting imagery closely, you'll notice that the
lighting is decidedly incorrect. The bunny in the mirror has
different local shading than the physical bunny. Which light source
should that bunny be lit by? For extra credit, describe the
problem in your README.txt file and improve the local shading on the
mirrored bunny. (Actually, the lighting on the physical bunny is
wrong too and can be improved!)
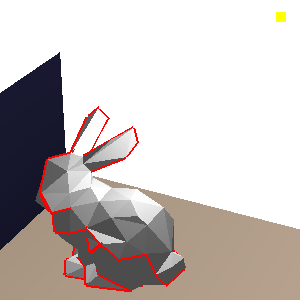
- Next, let's implement shadow volumes. The first step is to
determine the silhouette edges in the model. These are edges that have
one neighboring triangle facing toward the light source, the other
triangle facing away from the light source. Pressing 'e' will toggle
the visualization of these edges in red, as shown below. You need to
write the code to determine which edges are silhouettes and render this
geometry.
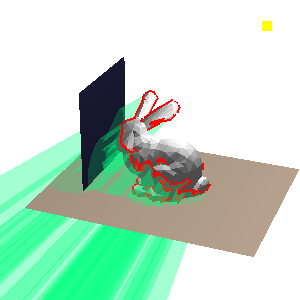
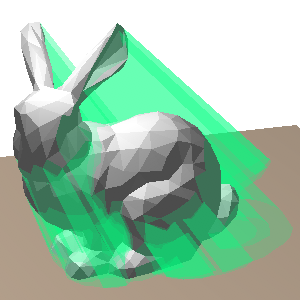
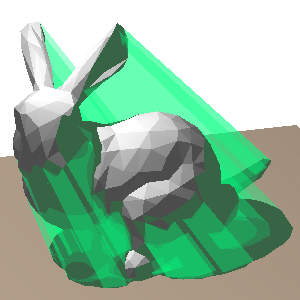
Once these edges are found, we can construct the polygons that
form the "sides" of the shadow volumes. These polygons are extrusions
of the silhouette edges away from the light source, towards infinity.
Pressing 'p' will toggle the visualization of these polygons in green,
as shown below, using blending so you can partially see through these
polygons and see the depth complexity of the multiple layers of shadow
volume polygons. You need to write the code to construct and render
these polygons.

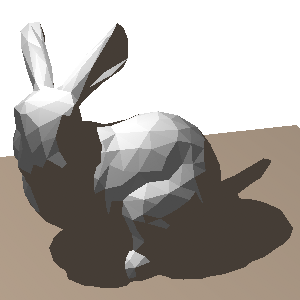
- The last step is to do the multi-step rendering to create the
shadows. This involves juggling the frame buffer, depth buffer, and
stencil buffer. The basic idea is to first render the scene without
lighting. Then, we do a special rendering pass of the shadow volume
polygons: everywhere the depth buffer passes, we will increment (if
the shadow volume polygon faces toward the camera) or decrement (if
the shadow volume polygon faces away from the camera) the stencil
buffer. Finally, we render the scene a second time with the lights
on, but only where the stencil buffer is zero. The shadow rendering
mode is toggled by pressing 's'.
An excellent stencil buffer tutorial written by Mark Kilgard at NVIDIA:
http://developer.nvidia.com/object/Stencil_Buffer_Tutorial.html
gives more detail on each step of the method.
- There are several extensions to the basic shadow volumes code
that you can do for extra credit, including: handle non-closed
objects, improve the efficiency of the method, make the shadow volumes
and mirror rendering methods work together (the same shadows should
appear in the physical scene and the mirror), or implement "Z-fail"
shadow volumes so that the rendering is correct when the camera is
inside of a shadow volume (create a new scene to demonstrate this
extension). Describe any extensions you make in your README.txt file.
- Part 2: GPU (10 points), coming soon.
Provided Files (hw4_files.zip)
- Basic Code (argparser.h, bag.h, boundingbox.h, boundingbox.cpp,
camera.h, camera.cpp, glCanvas.h, glCanvas.cpp, main.cpp, matrix.h,
matrix.cpp, utils.h, vectors.h, Makefile)
Similar to the previous assignments.
- Half-Edge Quad Mesh Data Structure (edge.h,
edge.cpp,
mesh.h,
mesh.cpp,
triangle.h,
vertex.h)
Similar to the triangle half-edge data structure you implemented in
assignment 1.
- Rendering (render.cpp)
The code for rendering the mesh with stencil buffer tricks.
- Test meshes (bunny_200.obj, bunny_1k.obj, bunny_40k.obj)
Please read the Homework information page again before submitting.
./hardware -input bunny_1k.obj
If you study the resulting imagery closely, you'll notice that the lighting is decidedly incorrect. The bunny in the mirror has different local shading than the physical bunny. Which light source should that bunny be lit by? For extra credit, describe the problem in your README.txt file and improve the local shading on the mirrored bunny. (Actually, the lighting on the physical bunny is wrong too and can be improved!)
Once these edges are found, we can construct the polygons that form the "sides" of the shadow volumes. These polygons are extrusions of the silhouette edges away from the light source, towards infinity. Pressing 'p' will toggle the visualization of these polygons in green, as shown below, using blending so you can partially see through these polygons and see the depth complexity of the multiple layers of shadow volume polygons. You need to write the code to construct and render these polygons.
An excellent stencil buffer tutorial written by Mark Kilgard at NVIDIA: http://developer.nvidia.com/object/Stencil_Buffer_Tutorial.html gives more detail on each step of the method.
Similar to the previous assignments.
Similar to the triangle half-edge data structure you implemented in assignment 1.
The code for rendering the mesh with stencil buffer tricks.